Chaining means that a server contacts other servers on behalf of a client application and then returns the combined results. Chaining is implemented through a database link, which points to data stored remotely. When a client application requests data from a database link, the database link retrieves the data from the remote database and returns it to the client.
Section 13.5, “Monitoring Database Link Activity” covers how to monitor database link activity.
These procedures describe configuring how Directory Server chains requests made by client applications to Directory Servers that contain database links. This chaining policy applies to all database links created on Directory Server.
A component is any functional unit in the server that uses internal operations. For example, plug-ins are considered to be components, as are functions in the front-end. However, a plug-in may actually be comprised of multiple components (for example, the ACI plug-in).
Some components send internal LDAP requests to the server, expecting to access local data only. For such components, control the chaining policy so that the components can complete their operations successfully. One example is the certificate verification function. Chaining the LDAP request made by the function to check certificates implies that the remote server is trusted. If the remote server is not trusted, then there is a security problem.
By default, all internal operations are not chained and no components are allowed to chain, although this can be overridden.
Additionally, an ACI must be created on the remote server to allow the specified plug-in to perform its operations on the remote server. The ACI must exist in the suffix assigned to the database link.
The following table lists component names, the potential side-effects of allowing them to chain internal operations, and the permissions they need in the ACI on the remote server:
| Component Name | Description | Permissions |
|---|---|---|
| ACI plug-in |
This plug-in implements access control. Operations used to retrieve and update ACI attributes are not chained because it is not safe to mix local and remote ACI attributes. However, requests used to retrieve user entries may be chained by setting the chaining components attribute, nsActiveChainingComponents: cn=ACI Plugin,cn=plugins,cn=config.
|
Read, search, and compare |
| Resource limit component | This component sets server limits depending on the user bind DN. Resource limits can be applied on remote users if the resource limitation component is allowed to chain. To chain resource limit component operations, add the chaining component attribute, nsActiveChainingComponents: cn=resource limits,cn=components,cn=config. | Read, search, and compare |
| Certificate-based authentication checking component | This component is used when the SASL-external bind method is used. It retrieves the user certificate from the database on the remote server. Allowing this component to chain means certificate-based authentication can work with a database link. To chain this component's operations, add the chaining component attribute, nsActiveChainingComponents: cn=certificate-based authentication,cn=components,cn=config. | Read, search, and compare |
| Referential Integrity plug-in | This plug-in ensures that updates made to attributes containing DNs are propagated to all entries that contain pointers to the attribute. For example, when an entry that is a member of a group is deleted, the entry is automatically removed from the group. Using this plug-in with chaining helps simplify the management of static groups when the group members are remote to the static group definition. To chain this component's operations, add the chaining component attribute, nsActiveChainingComponents: cn=referential integrity postoperation,cn=plugins,cn=config. | Read, write, search, and compare |
| Attribute Uniqueness plug-in |
This plug-in checks that all the values for a specified uid attribute are unique (no duplicates). If this plug-in is chained, it confirms that the uid attribute values are unique even on attributes changed through a database link. To chain this component's operations, add the chaining component attribute, nsActiveChainingComponents: cn=attribute uniqueness,cn=plugins,cn=config
|
Read, search, and compare |
Table 3.2. Components Allowed to Chain
NOTE
The following components cannot be chained:
-
Roles plug-in
-
Password policy component
-
Replication plug-ins
-
Referential Integrity plug-in
When enabling the Referential Integrity plug-in on servers issuing chaining requests, be sure to analyze performance, resource, and time needs as well as integrity needs. Integrity checks can be time-consuming and draining on memory and CPU. For further information on the limitations surrounding ACIs and chaining, see Section 6.1.4, “ACI Limitations”.
After modifying the components allowed to chain, restart the server in order for the modification to take effect.
-
In the Directory Server Console, select the Configuration tab.
-
Expand Data in the left pane, and click Database Link Settings.
-
Select the Settings tab in the right window. To add a component to the Components allowed to chain list, click Add.
The Select Components to Add dialog box displays. Select a component from the list, and click OK.
-
To delete a component from the list, select it, and click Delete.
-
Click Save.
-
Restart the server in order for the change to take effect.
After allowing the component to chain, create an ACI in the suffix on the remote server to which the operation will be chained. For example, this creates an ACI for the Referential Integrity plug-in:
aci: (targetattr "*")(target="ldap:///ou=customers,l=us,dc=example,dc=com")
     (version 3.0; acl "RefInt Access for chaining"; allow
     (read,write,search,compare) userdn = "ldap:///cn=referential integrity
     postoperation,cn=plugins,cn=config";)
-
Specify components to include in chaining using the
nsActiveChainingComponentsattribute in thecn=config,cn=chaining database,cn=plugins,cn=configentry of the configuration file.For example, to allow the referential integrity component to chain operations, add the following to the database link configuration file:
nsActiveChainingComponents: cn=referential integrity postoperation,cn=components,cn=config
See Table 3.2, “Components Allowed to Chain” for a list of the components which can be chained.
-
Restart the server for the change to take effect. [3]
service dirsrv restart
instance -
Create an ACI in the suffix on the remote server to which the operation will be chained. For example, this creates an ACI for the Referential Integrity plug-in:
aci: (targetattr "*")(target="ldap:///ou=customers,l=us,dc=example,dc=com")
     (version 3.0; acl "RefInt Access for chaining"; allow
     (read,write,search,compare) userdn = "ldap:///cn=referential
     integrity postoperation,cn=plugins,cn=config";)
It is possible to not chain operation requests made by LDAP controls. By default, requests made by the following controls are forwarded to the remote server by the database link:
-
Virtual List View (VLV). This control provides lists of parts of entries rather than returning all entry information.
-
Server-side sorting. This control sorts entries according to their attribute values.
-
Managed DSA. This controls returns smart referrals as entries, rather than following the referral, so the smart referral itself can be changed or deleted.
-
Loop detection. This control keeps track of the number of times the server chains with another server. When the count reaches the configured number, a loop is detected, and the client application is notified. For more information about using this control, see Section 3.3.7.5, “Detecting Loops”.
NOTE
Server-side sorting and VLV controls are supported only when a client application request is made to a single database. Database links cannot support these controls when a client application makes a request to multiple databases.
-
In the Directory Server Console, select the Configuration tab.
-
Expand the Data folder in the left pane, and click Database Link Settings.
-
Select the Settings tab in the right window. To add an LDAP control to the list, click Add.
The Select control OIDs to add dialog box displays. Select the OID of a control to add to the list, and click OK.
-
To delete a control from the list, select it from the LDAP controls forwarded to the remote server list, and click Delete.
-
Click Save.
Alter the controls that the database link forwards by changing the nsTransmittedControls attribute of the cn=config,cn=chaining database, cn=plugins,cn=config entry. For example, to forward the virtual list view control, add the following to the database link entry in the configuration file:
nsTransmittedControls: 2.16.840.1.113730.3.4.9
In addition, if clients of the Directory Server create their own controls and their operations should to be chained to remote servers, add the OID of the custom control to the nsTransmittedControls attribute.
The LDAP controls which can be chained and their OIDs are listed in the following table:
| Control Name | OID |
|---|---|
| Virtual list view (VLV) | 2.16.840.1.113730.3.4.9 |
| Server-side sorting | 1.2.840.113556.1.4.473 |
| Managed DSA | 2.16.840.1.113730.3.4.2 |
| Loop detection | 1.3.6.1.4.1.1466.29539.12 |
Table 3.3. LDAP Controls and Their OIDs
For more information about LDAP controls, refer to the LDAP C-SDK documentation at http://www.mozilla.org/directory.
The basic configuration of the database link involves the following information:
-
Suffix information. A suffix is created in the directory tree that is managed by the database link, not a regular database. This suffix corresponds to the suffix on the remote server that contains the data.
-
Bind credentials. When the database link binds to a remote server, it impersonates a user, and this specifies the DN and the credentials for each database link to use to bind with remote servers.
-
LDAP URL. This supplies the LDAP URL of the remote server to which the database link connects.
-
List of failover servers. This supplies a list of alternative servers for the database link to contact in the event of a failure. This configuration item is optional.
To create a new database link using the Directory Server Console:
-
In the Directory Server Console, select the Configuration tab.
-
Right-click Data in the left navigation pane, and select New Root Suffix or New Sub Suffix from the pop-up menu.
A Create New Suffix dialog box is displayed.
-
Enter the name of the suffix on the remote server to which to chain the suffix in the New suffix field.
The suffix must be named in line with
dcnaming conventions, such asdc=example,dc=com. -
Deselect the Create associated database automatically checkbox.
The checkbox must not be selected because a database link cannot be added to a suffix that is associated with a database. This suffix is used only by the database link.
-
Click OK.
The suffix appears automatically under Data in the left navigation pane.
-
In the left pane, right-click the new suffix, and select New Database Link from the pop-up menu.
The Create New Database Link dialog box is displayed.
-
Enter the name of the new database link in the Database link name field, such as
examplelink1. The name can be a combination of alphanumeric characters, dashes (-), and underscores (_). No other characters are allowed. -
Enter the DN used by the database link to bind to the remote server in the Bind DN field, such as
cn=dblink. -
Enter the password used by the database link to bind to the remote server in the Password field.
-
Select the Use a secure LDAP connection between servers checkbox for the database link to use SSL to communicate to the remote server.
-
Enter the name of the remote server in the Remote server field. Enter the server port number used for the bind in the Remote server port field. The default port number is
389. The default SSL port number is636. -
Enter the name of a failover server in the Failover Server(s) field, and specify a port number in the Port field. The default port number is
389. The default SSL port number is636. Click Add to add the failover server to the list.There can be multiple failover servers specified. If the primary remote server fails, the database link contacts the first server in the Failover Servers list. If it fails, it contacts the next in the list, and so on.
-
Click OK to create the new database link. Click OK to dismiss the success dialog box that appears after the database link has been created.
The new database link appears under the suffix in the left navigation pane.
TIP
The Console provides a checklist of information that needs to be present on the remote server for the database link to bind successfully. To view this checklist, click the new database link, and click the Authentication tab. The checklist appears in the Remote server checklist box.
-
Use the
ldapmodifycommand-line utility to create a new database link from the command-line. The new instance must be located in thecn=chaining database,cn=plugins,cn=configentry.ldapmodify -a -p 389 -D "cn=directory manager" -w secret -h us.example.com
-
Specify the configuration information for the database link:
dn: cn=examplelink,cn=chaining database,cn=plugins,cn=config
objectclass: top
objectclass: extensibleObject
objectclass: nsBackendInstance
nsslapd-suffix: ou=people,dc=example,dc=com suffix being chained
nsfarmserverurl: ldap://people.example.com:389/  LDAP URL to remote server
nsmultiplexorbinddn: cn=proxy admin,cn=config bind DN
nsmultiplexorcredentials: secret bind password
cn: examplelink
Default configuration attributes are contained in the cn=default config, cn=chaining database,cn=plugins,cn=config entry. These configuration attributes apply to all database links at creation time. Changes to the default configuration only affect new database links. The default configuration attributes on existing database links cannot be changed.
Each database link contains its own specific configuration information, which is stored with the database link entry itself, cn=database_link, cn=chaining database,cn=plugins,cn=config. For more information about configuration attributes, refer to the Directory Server Configuration, Command, and File Reference.
Use the nsslapd-suffix attribute to define the suffix managed by the database link. For example, for the database link to point to the people information for a remote site of the company, enter the following suffix information:
nsslapd-suffix: l=Zanzibar,ou=people,dc=example,dc=com
The suffix information is stored in the cn=database_link, cn=chaining database,cn=plugins,cn=config entry.
NOTE
After creating the database link, any alterations to the nsslapd-nsslapd-suffix attribute are applied only after the server containing the database link is restarted.
For a request from a client application to be chained to a remote server, special bind credentials can be supplied for the client application. This gives the remote server the proxied authorization rights needed to chain operations. Without bind credentials, the database link binds to the remote server as anonymous.
Providing bind credentials involves the following steps:
-
On the remote server, do the following:
-
Create an administrative user for the database link.
For information on adding entries, see Chapter 2, Creating Directory Entries.
-
Provide proxy access rights for the administrative user created in step 1 on the subtree chained to by the database link.
For more information on configuring ACIs, see Chapter 6, Managing Access Control
-
-
On the server containing the database link, use
ldapmodifyto provide a user DN for the database link in thensMultiplexorBindDNattribute of thecn=database_link,cn=chaining database,cn=plugins,cn=configentry.CAUTION
The
nsMultiplexorBindDNcannot be that of the Directory Manager.Use
ldapmodifyto provide a user password for the database link in thensMultiplexorCredentialsattribute of thecn=database_link,cn=chaining database,cn=plugins,cn=configentry.
For example, a client application sends a request to server A. Server A contains a database link that chains the request to a database on server B.

The database link on server A binds to server B using a special user as defined in the nsMultiplexorBindDN attribute and a user password as defined in the nsMultiplexorCredentials attribute. In this example, server A uses the following bind credentials:
nsMultiplexorBindDN: cn=proxy admin,cn=config
nsMultiplexorCredentials: secret

Server B must contain a user entry corresponding to the nsMultiplexorBindDN, and set the proxy authentication rights for this user. To set the proxy authorization correctly, set the proxy ACI as any other ACI.
CAUTION
Carefully examine access controls when enabling chaining to avoid giving access to restricted areas of the directory. For example, if a default proxy ACI is created on a branch, the users that connect via the database link will be able to see all entries below the branch. There may be cases when not all of the subtrees should be viewed by a user. To avoid a security hole, create an additional ACI to restrict access to the subtree.
For more information on ACIs, see Chapter 6, Managing Access Control. For more information about the proxy authentication control, refer to the LDAP C-SDK documentation at http://www.mozilla.org/directory.
NOTE
When a database link is used by a client application to create or modify entries, the attributes creatorsName and modifiersName do not reflect the real creator or modifier of the entries. These attributes contain the name of the administrative user granted proxied authorization rights on the remote data server.
On the server containing the database link, identify the remote server that the database link connects with using an LDAP URL. Unlike the standard LDAP URL format, the URL of the remote server does not specify a suffix. It takes the form ldap://hostname:port.
The URL of the remote server using the nsFarmServerURL attribute is set in the cn=database_link, cn=chaining database,cn=plugins,cn=config entry of the configuration file.
nsFarmServerURL: ldap://example.com:389/
Do not forget to use the trailing slash (/) at the end of the URL.
For the database link to connect to the remote server using LDAP over SSL, the LDAP URL of the remote server uses the protocol LDAPS instead of LDAP in the URL, such as ldaps://example.com:636.
For more information about chaining and SSL, see Section 3.3.3, “Chaining Using SSL”.
There can be additional LDAP URLs for servers included to use in the case of failure. Add alternate servers to the nsFarmServerURL attribute, separated by spaces.
nsFarmServerURL: ldap://example.com us.example.com:389 africa.example.com:1000/
In this sample LDAP URL, the database link first contacts the server example.com on the standard port to service an operation. If it does not respond, the database link then contacts the server us.example.com on port 389. If this server fails, it then contacts africa.example.com on port 1000.
The following table lists the attributes available for configuring a database link. Some of these attributes were discussed in the earlier sections. All instance attributes are defined in the cn=database_link, cn=chaining database,cn=plugins,cn=config entry.
Values defined for a specific database link take precedence over the global attribute value.
| Attributes | Value |
|---|---|
| nsTransmittedControls [†] | Gives the OID of LDAP controls forwarded by the database link to the remote data server. |
| nsslapd-suffix | The suffix managed by the database link. Any changes to this attribute after the entry has been created take effect only after the server containing the database link is restarted. |
| nsslapd-timelimit |
Default search time limit for the database link, given in seconds. The default value is 3600 seconds.
|
| nsslapd-sizelimit |
Default size limit for the database link, given in number of entries. The default value is 2000 entries.
|
| nsFarmServerURL | Gives the LDAP URL of the remote server (or farm server) that contains the data. This attribute can contain optional servers for failover, separated by spaces. If using cascading chaining, this URL can point to another database link. |
| nsMultiplexorBindDN |
DN of the administrative entry used to communicate with the remote server. The term multiplexor in the name of the attribute means the server which contains the database link and communicates with the remote server. This bind DN cannot be the Directory Manager. If this attribute is not specified, the database link binds as anonymous.
|
| nsMultiplexorCredentials |
Password for the administrative user, given in plain text. If no password is provided, it means that users can bind as anonymous. The password is encrypted in the configuration file.
|
| nsCheckLocalACI |
Reserved for advanced use only. Controls whether ACIs are evaluated on the database link as well as the remote data server. Takes the values on or off. Changes to this attribute occur only after the server has been restarted. The default value is off.
|
| nsProxiedAuthorization |
Reserved for advanced use only. Disables proxied authorization. A value of off means proxied authorization is disabled. The default value is on.
|
| nsActiveChainingComponents[†] |
Lists the components using chaining. A component is any functional unit in the server. The value of this attribute in the database link instance overrides the value in the global configuration attribute. To disable chaining on a particular database instance, use the value none. The default policy is not to allow chaining. For more information, see Section 3.3.1.1, “Chaining Component Operations”.
|
| nsReferralOnScopedSearch |
Controls whether referrals are returned by scoped searches. This attribute is for optimizing the directory because returning referrals in response to scoped searches is more efficient. Takes the values on or off. The default value is off.
|
| nsHopLimit |
Maximum number of times a request can be forwarded from one database link to another. The default value is 10.
|
|
[†]
Can be both a global and instance attribute. This global configuration attribute is located in the |
|
Table 3.4. Database Link Configuration Attributes
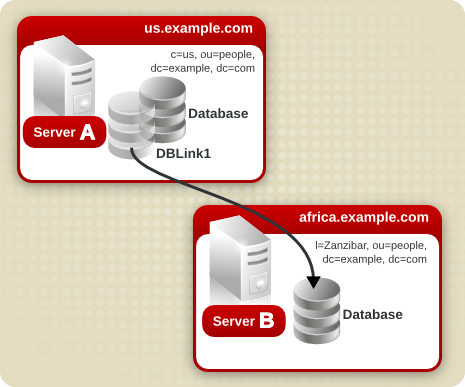
Suppose a server within the us.example.com domain contains the subtree l=Walla Walla,ou=people,dc=example,dc=com on a database and that operation requests for the l=Zanzibar,ou=people,dc=example,dc=com subtree should be chained to a different server in the africa.example.com domain.
-
Run
ldapmodify[2] to add a database link to server A:ldapmodify -a -p 389 -D "cn=directory manager" -w secret -h us.example.com
-
Specify the configuration information for the database link:
dn: cn=DBLink1,cn=chaining database,cn=plugins,cn=config
objectclass: top
objectclass: extensibleObject
objectclass: nsBackendInstance
nsslapd-suffix: l=Zanzibar,ou=people,dc=example,dc=com
nsfarmserverurl: ldap://africa.example.com:389/
nsmultiplexorbinddn: cn=proxy admin,cn=config
nsmultiplexorcredentials: secret
cn: DBLink1

dn: cn=l=Zanzibar,ou=people,dc=example,dc=com,cn=mapping tree,cn=config
objectclass: top
objectclass: extensibleObject
objectclass: nsMappingTree
nsslapd-state: backend
nsslapd-backend: DBLink1
nsslapd-parent-suffix: ou=people,dc=example,dc=com
cn: l=Zanzibar,ou=people,dc=example,dc=com
In the first entry, the
nsslapd-suffixattribute contains the suffix on server B to which to chain from server A. ThensFarmServerURLattribute contains the LDAP URL of server B.The second entry creates a new suffix, allowing the server to route requests made to the new database link. The
cnattribute contains the same suffix specified in thensslapd-suffixattribute of the database link. Thensslapd-backendattribute contains the name of the database link. Thensslapd-parent-suffixattribute specifies the parent of this new suffix,ou=people,dc=example,dc=com. -
Create an administrative user on server B, as follows:
dn: cn=proxy admin,cn=config
objectclass: person
objectclass: organizationalPerson
objectclass: inetOrgPerson
cn: proxy admin
sn: proxy admin
userPassword: secret
description: Entry for use by database links
CAUTION
Do not use the Directory Manager user as the proxy administrative user on the remote server. This creates a security hole.
-
Add the following proxy authorization ACI to the
l=Zanzibar,ou=people,dc=example,dc=comentry on server B:aci: (targetattr = "*")(version 3.0; acl "Proxied authorization for database links"; allow (proxy) userdn = "ldap:///cn=proxy admin,cn=config";)This ACI gives the proxy admin user read-only access to the data contained on the remote server within the
l=Zanzibar,ou=people,dc=example,dc=comsubtree only.NOTE
When a user binds to a database link, the user's identity is sent to the remote server. Access controls are always evaluated on the remote server. For the user to modify or write data successfully to the remote server, set up the correct access controls on the remote server. For more information about how access controls are evaluated in the context of chained operations, see Section 3.3.5, “Database Links and Access Control Evaluation”.
Database links can be configured to communicate with the remote server using SSL. Using SSL to chain involves the following steps:
-
Enable SSL on the remote server.
-
Specify the LDAP URL of the remote server in SSL format in the
nsFarmServerURLattribute. For more information about this attribute, see Section 3.3.2.2.3, “Providing an LDAP URL”. For example:nsFarmServerURL: ldaps://africa.example.com:636/
-
Enable SSL on the server that contains the database link.
For more information on enabling SSL, see Section 11.1.1, “Enabling SSL: Summary of Steps”.
When the database link and remote server are configured to communicate using SSL, this does not mean that the client application making the operation request must also communicate using SSL. The client can bind using a normal port.
This section describe how to update and delete existing database links. It contains the following procedures:
To update the bind DN and password used by the database link to connect to the remote server, do the following:
-
In the Directory Server Console, select the Configuration tab.
-
In the left pane, expand the Data folder, and locate the database link to update under one of the suffixes. Select the database link.
-
In the right navigation pane, click the Authentication tab.
-
To update the remote server information, enter a new LDAP URL in the Remote Server URL field.
Unlike the standard LDAP URL format, the URL of the remote server does not specify a suffix. It takes the form
ldap://hostname:port/. -
Update the bind DN used by the database link to bind with the remote server by entering a new DN in the Database link bind DN field.
-
Update the password used by the database link to bind with the remote server by entering a new password in the Database link password field. Confirm the password by retyping it in the Confirm database link password field.
The remote server checklist box lists the administrative user entry, suffix, and ACI that need to exist on the remote server for the database link to bind successfully.
-
Click Save.
To delete a database link, do the following:
-
In the Directory Server Console, select the Configuration tab.
-
In the left navigation pane, locate the database link to delete, and select it.
-
From the Object menu, select Delete.
Alternatively, right-click the database link, and select Delete from the pop-up menu.
The Deleting Database Link confirmation dialog box is displayed.
-
Click Yes to confirm the deletion of the database link.
Once deleted, the database link no longer appears in the right pane.
When a user binds to a server containing a database link, the database link sends the user's identity to the remote server. Access controls are always evaluated on the remote server. Every LDAP operation evaluated on the remote server uses the original identity of the client application passed via the proxied authorization control. Operations succeed on the remote server only if the user has the correct access controls on the subtree contained on the remote server. This requires adding the usual access controls to the remote server with a few restrictions:
-
Not all types of access control can be used.
For example, role-based or filter-based ACIs need access to the user entry. Because the data are accessed through database links, only the data in the proxy control can be verified. Consider designing the directory in a way that ensures the user entry is located in the same database as the user's data.
-
All access controls based on the IP address or DNS domain of the client may not work since the original domain of the client is lost during chaining. The remote server views the client application as being at the same IP address and in the same DNS domain as the database link.
The following restrictions apply to the ACIs used with database links:
-
ACIs must be located with any groups they use. If the groups are dynamic, all users in the group must be located with the ACI and the group. If the group is static, it may refer to remote users.
-
ACIs must be located with any role definitions they use and with any users intended to have those roles.
-
ACIs that refer to values of a user's entry (for example,
userattrsubject rules) will work if the user is remote.
Though access controls are always evaluated on the remote server, they can also be evaluated on both the server containing the database link and the remote server. This poses several limitations:
-
During access control evaluation, contents of user entries are not necessarily available (for example, if the access control is evaluated on the server containing the database link and the entry is located on a remote server).
For performance reasons, clients cannot do remote inquiries and evaluate access controls.
-
The database link does not necessarily have access to the entries being modified by the client application.
When performing a modify operation, the database link does not have access to the full entry stored on the remote server. If performing a delete operation, the database link is only aware of the entry's DN. If an access control specifies a particular attribute, then a delete operation will fail when being conducted through a database link.
NOTE
By default, access controls set on the server containing the database link are not evaluated. To override this default, use the nsCheckLocalACI attribute in the cn=database_link, cn=chaining database,cn=plugins,cn=config entry. However, evaluating access controls on the server containing the database link is not recommended except with cascading chaining.
The following sections provide information on tuning the performance of database links through connection and thread management.
Each database link maintains a pool of connections to a remote server. The connections to optimize resources can be configured for the directory.
-
In the Directory Server Console, select the Configuration tab.
-
Expand the Data folder in the left pane and locate the database link to change. Click the database link, then click the Limits and Controls tab in the right navigation pane.
-
In the Connection Management section, make changes to any of the following fields:
-
Maximum TCP connection(s). The maximum number of TCP connections that the database link establishes with the remote server. The default value is
3connections. -
Bind timeout. Amount of time, in seconds, before the database link's bind attempt times out. The default value is
15seconds. -
Maximum binds per connection. Maximum number of outstanding bind operations per TCP connection. The default value is
10outstanding bind operations per connection. -
Time out before abandon (sec). Number of seconds before the server checks to see if a timed-out connection should be abandoned. The default value is
1seconds. -
Maximum LDAP connection(s). Maximum number of LDAP connections that the database link establishes with the remote server. The default value is
10connections. -
Maximum bind retries. Number of times a database link attempts to bind to the remote server. A value of
0indicates that the database link will try to bind only once. The default value is3attempts. -
Maximum operations per connection. Maximum number of outstanding operations per LDAP connection. The default value is
2operations per connection. -
Connection lifetime (sec). How long a connection made between the database link and remote server remains open. Connections between the database link and the remote server can be kept open for an unspecified time or closed after a specific period of time. It is faster to keep the connections open, but it uses more resources. For slow connections, it may be desirable to limit the connection time. A value of
0indicates there is no limit. By default, the value is set to0.
-
-
Click Save.
Use ldapmodify to add connection attributes to the database link entry.
The default connection management attributes are stored in the following entry:
cn=default instance config,cn=chaining database,cn=plugins,cn=config
The connection management attributes for a specific database link are stored in the following entry:
cn=database_link,cn=chaining database,cn=plugins,cn=config
The connection management attributes specified in this entry take precedence over the attributes specified in the cn=default instance config entry.
| Attribute Name | Description |
|---|---|
| nsOperationConnectionsLimit |
Maximum number of LDAP connections that the database link establishes with the remote server. The default value is 20 connections per database link instance.
|
| nsBindConnectionsLimit |
Maximum number of TCP connections that the database link establishes with the remote server. The default value is 3 connections.
|
| nsConcurrentOperationsLimit |
Maximum number of outstanding operations per LDAP connection. The default value is 2 operations per connection.
|
| nsConcurrentBindLimit |
Maximum number of outstanding bind operations per TCP connection. The default value is 10 outstanding bind operations.
|
| nsBindRetryLimit |
Number of times a database link attempts to bind to the remote server. A value of zero (0) indicates that the database link will try to bind only once. The default value is 3 attempts.
|
| nsConnectionLife |
Connection lifetime, in seconds. Connections between the database link and the remote server can be kept open for an unspecified time or closed after a specific period of time. It is faster to keep the connections open, but it uses more resources. For example, it may be wise to limit the connection time for a slow connection. A value of 0 indicates there is no limit. By default, the value is set to 0. When the value is 0 and there is a list of failover servers in the nsFarmServerURL attribute, the first server is never contacted after failover to the alternate server. The default value is 0 seconds.
|
| nsBindTimeout |
Amount of time, in seconds, before the bind attempt times out. The default value is 15 seconds.
|
| nsAbandonedSearchCheckInterval |
Number of seconds that pass before the server checks for abandoned operations. The default value is 1 seconds.
|
Table 3.5. Database Link Connection Management Attributes
For the list of database link configuration attributes, see Table 3.4, “Database Link Configuration Attributes”.
Protect server performance by detecting errors during the normal chaining operation between the database link and the remote server. The database link has two attributes — nsMaxResponseDelay and nsMaxTestResponseDelay — which work together to determine if the remote server is no longer responding.
The first attribute, nsMaxResponseDelay, sets a maximum duration for an LDAP operation to complete. If the operation takes more than the amount of time specified in this attribute, the database link's server suspects that the remote server is no longer online.
Once the nsMaxResponseDelay period has been met, the database link pings the remote server. During the ping, the database link issues another LDAP request, a simple search request for an object that does not exist in the remote server. The duration of the ping is set using the nsMaxTestResponseDelay.
If the remote server does not respond before the nsMaxTestResponseDelay period has passed, then an error is returned, and the connection is flagged as down. All connections between the database link and remote server will be blocked for 30 seconds, protecting the server from a performance degradation. After 30 seconds, operation requests made by the database link to the remote server continue as normal.
Both attributes are stored in the cn=config,cn=chaining database,cn=plugins,cn=config entry. The following table describes the attributes in more detail:
| Attribute Name | Description |
|---|---|
| nsMaxResponseDelay |
Maximum amount of time it can take a remote server to respond to an LDAP operation request made by a database link before an error is suspected. This period is given in seconds. The default delay period is 60 seconds. Once this delay period has been met, the database link tests the connection with the remote server.
|
| nsMaxTestResponseDelay |
Duration of the test issued by the database link to check whether the remote server is responding. If a response from the remote server is not returned before this period has passed, the database link assumes the remote server is down, and the connection is not used for subsequent operations. This period is given in seconds. The default test response delay period is 15 seconds.
|
Table 3.6. Database Link Processing Error Detection Parameters
Generally, Directory Server performs best using a limited number of threads for processing operations. A limited number of threads can generally process operations very quickly, preventing the queue of operations waiting for a free thread from growing too long.
However, the database link forwards operations to remote servers for processing. The database link contacts the remote server, forwards the operation, waits for the result, and then sends the result back to the client application. The entire operation can take much longer than a local operation.
While the database link waits for results from the remote server, it can process additional operations. By default, the number of threads used by the server is 30. However, when using database links, performance can be improved by increasing the number of threads available for processing operations. While the local CPU waits for a response from a remote server, it can process other operations rather than stand idle.
To change the number of threads used for processing operations, change the nsslapd-thread number global configuration attribute in the cn=config entry. Increasing the thread number can improve performance; the default thread number is 30. Restart the server after changing the thread count to apply the changes.
The database link can be configured to point to another database link, creating a cascading chaining operation. A cascading chain occurs any time more than one hop is required to access all of the data in a directory tree.
Cascading chaining occurs when more than one hop is required for the directory to process a client application's request. For example:

The client application sends a modify request to server one. Server one contains a database link that forwards the operation to server two, which contains another database link. The database link on server two forwards the operations to server three, which contains the data the clients wants to modify in a database. Two hops are required to access the piece of data the client want to modify.
During a normal operation request, a client binds to the server, and then any ACIs applying to that client are evaluated. With cascading chaining, the client bind request is evaluated on server one, but the ACIs applying to the client are evaluated only after the request has been chained to the destination server, in the above example server two.
Consider the following example scenario. On server A, a directory tree is split as follows:

The root suffix dc=example,dc=comand the ou=people and ou=groups sub suffixes are stored on server A. The l=europe,dc=example,dc=com and ou=groups suffixes are stored in on server B, and the ou=people branch of the l=europe,dc=example,dc=com suffix is stored on server C.
With cascading configured on servers A, B, and C, a client request targeted at the ou=people,l=europe,dc=example,dc=com entry would be routed by the directory as follows:
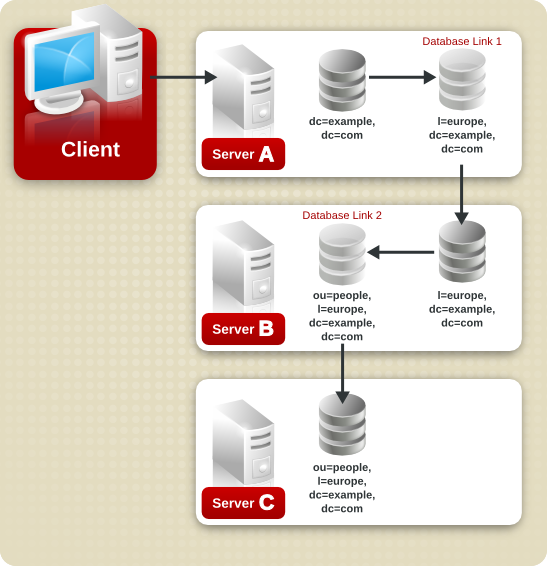
First, the client binds to server A and chains to server B using Database Link 1. Then server B chains to the target database on server C using Database Link 2 to access the data in the ou=people,l=europe,dc=example,dc=com branch. Because at least two hops are required for the directory to service the client request, this is considered a cascading chain.
To set cascading chaining defaults for all database links in Directory Server, do the following:
-
In the Directory Server Console, select the Configuration tab.
-
Expand the Data folder in the left pane, and click Database Link Settings. Click the Default Creation Parameters tab.
-
Select the Check local ACI checkbox to enable the evaluation of local ACIs on the intermediate database links involved in cascading chaining. Selecting this checkbox may require adding the appropriate local ACIs to a database on the servers that contain intermediate database links.
-
Enter the maximum number of times a database link can point to another database link in the Maximum hops field.
By default, the maximum is
10hops. After10hops, a loop is detected by the server, and an error is returned to the client application. -
Click Save.
NOTE
Changes made to the default settings of a database link are not applied retroactively. Only the database links created after changes are made to the default settings will reflect the changes.
To configure cascading chaining for a particular set of database links, do the following:
-
In the Directory Server Console, select the Configuration tab.
-
Expand the Data folder in the left pane, and locate the database link to include in a cascading chain. Click the database link, then click the Limits and Controls tab in the right navigation pane.
-
Select the Check local ACI checkbox to enable the evaluation of local ACIs on the intermediate database links involved in the cascading chain. Selecting this checkbox may require adding the appropriate local ACIs to the database link.
-
Enter the maximum number of times a database link can point to another database link in the Maximum hops field.
By default, the maximum is ten hops. After ten hops, a loop is detected by the server, and an error is returned to the client application.
-
Click Save.
To configure a cascade of database links through the command-line, do the following:
-
Point one database link to the URL of the server containing the intermediate database link.
To create a cascading chain, the
nsFarmServerURLattribute of one database link must contain the URL of the server containing another database link. Suppose the database link on the server calledexample1.compoints to a database link on the server calledafrica.example.com. For example, thecn=database_link,cn=chaining database, cn=plugins,cn=configentry of the database link on server one would contain the following:nsFarmServerURL: ldap://africa.example.com:389/
-
Configure the intermediate database link or links (in the example, server two) to transmit the Proxy Authorization Control.
By default, a database link does not transmit the Proxy Authorization Control. However, when one database link contacts another, this control is used to transmit information needed by the final destination server. The intermediate database link needs to transmit this control. To configure the database link to transmit the proxy authorization control, add the following to the
cn=config,cn=chaining database,cn=plugins,cn=configentry of the intermediate database link:nsTransmittedControls: 2.16.840.1.113730.3.4.12
The OID value represents the Proxy Authorization Control. For more information about chaining LDAP controls, see Section 3.3.1.2, “Chaining LDAP Controls”.
-
Create a proxy administrative user ACI on all intermediate database links.
The ACI must exist on the server that contains the intermediate database link that checks the rights of the first database link before translating the request to another server. For example, if server two does not check the credentials of server one, then anyone could bind as
anonymousand pass a proxy authorization control allowing them more administrative privileges than appropriate. The proxy ACI prevents this security breach.-
Create a database, if one does not already exist, on the server containing the intermediate database link. This database will contain the admin user entry and the ACI. For information about creating a database, see Section 3.2.1, “Creating Databases”.
-
Create an entry that corresponds to the administrative user in the database.
-
Create an ACI for the administrative user that targets the appropriate suffix. This ensures the administrator has access only to the suffix of the database link. For example:
aci: (targetattr = "*")(version 3.0; acl "Proxied authorization
     for database links"; allow (proxy) userdn = "ldap:///cn=proxy
     admin,cn=config";)
This ACI is like the ACI created on the remote server when configuring simple chaining.
CAUTION
Carefully examine access controls when enabling chaining to avoid giving access to restricted areas of the directory. For example, if a default proxy ACI is created on a branch, the users that connect through the database link will be able to see all entries below the branch. There may be cases when not all of the subtrees should be viewed by a user. To avoid a security hole, create an additional ACI to restrict access to the subtree.
-
-
Enable local ACI evaluation on all intermediate database links.
To confirm that the proxy administrative ACI is used, enable evaluation of local ACIs on all intermediate database links involved in chaining. Add the following attribute to the
cn=database_link,cn=chaining database,cn=plugins,cn=configentry of each intermediate database link:nsCheckLocalACI: on
Setting this attribute to
onin thecn=default instance config,cn=chaining database,cn=plugins,cn=configentry means that all new database link instances will have thensCheckLocalACIattribute set toonin theircn=database_link,cn=chaining database,cn=plugins,cn=configentry. -
Create client ACIs on all intermediate database links and the final destination database.
Because local ACI evaluation is enabled, the appropriate client application ACIs must be created on all intermediate database links, as well as the final destination database. To do this on the intermediate database links, first create a database that contains a suffix that represents a root suffix of the final destination suffix.
For example, if a client request made to the
c=africa,ou=people,dc=example,dc=comsuffix is chained to a remote server, all intermediate database links need to contain a database associated with thedc=example,dc=comsuffix.Add any client ACIs to this superior suffix entry. For example:
aci: (targetattr = "*")(version 3.0; acl "Client authentication for database link users"; allow (all) userdn = "ldap:///uid=* ,cn=config";)This ACI allows client applications that have a
uidin thecn=configentry of server one to perform any type of operation on the data below theou=people,dc=example,dc=comsuffix on server three.
An LDAP control included with Directory Server prevents loops. When first attempting to chain, the server sets this control to be the maximum number of hops, or chaining connections, allowed. Each subsequent server decrements the count. If a server receives a count of 0, it determines that a loop has been detected and notifies the client application.
The number of hops allowed is defined using the nsHopLimit attribute. If not specified, the default value is 10.
To use the control, add the following OID to the nsTransmittedControl attribute in the cn=config,cn=chaining database,cn=plugins,cn=config entry:
nsTransmittedControl: 1.3.6.1.4.1.1466.29539.12
If the control is not present in the configuration file of each database link, loop detection will not be implemented.
The following table describes the attributes used to configure intermediate database links in a cascading chain:
| Attribute | Description |
|---|---|
| nsFarmServerURL | URL of the server containing the next database link in the cascading chain. |
| nsTransmittedControls |
Enter the following OIDs to the database links involved in the cascading chain:
nsTransmittedControls: 2.16.840.1.113730.3.4.12 nsTransmittedControls: 1.3.6.1.4.1.1466.29539.12The first OID corresponds to the Proxy Authorization Control. The second OID corresponds to the Loop Detection Control. |
| aci |
This attribute must contain the following ACI:
aci: (targetattr = "*")(version 3.0; acl "Proxied authorization for database links";
      allow (proxy) userdn = "ldap:///cn=proxy admin,cn=config";)
|
| nsCheckLocalACI |
To enable evaluation of local ACIs on all database links involved in chaining, turn local ACI evaluation on, as follows:
nsCheckLocalACI: on |
Table 3.7. Cascading Chaining Configuration Attributes
To create a cascading chain involving three servers as in the diagram below, the chaining components must be configured on all three servers.

-
Run
ldapmodify[2]:ldapmodify -a -D "cn=directory manager" -w secret -h host -p 389
-
Then specify the configuration information for the database link, DBLink1, on server one, as follows:
dn: cn=DBLink1,cn=chaining database,cn=plugins,cn=config
objectclass: top
objectclass: extensibleObject
objectclass: nsBackendInstance
nsslapd-suffix: c=africa,ou=people,dc=example,dc=com
nsfarmserverurl: ldap://africa.example.com:389/
nsmultiplexorbinddn: cn=server1 proxy admin,cn=config
nsmultiplexorcredentials: secret
cn: DBLink1
nsCheckLocalACI:off

dn: cn="c=africa,ou=people,dc=example,dc=com",cn=mapping tree,cn=config
objectclass=nsMappingTree
nsslapd-state=backend
nsslapd-backend=DBLink1
nsslapd-parent-suffix: ou=people,dc=example,dc=com
cn: c=africa,ou=people,dc=example,dc=com
The first section creates the entry associated with
DBLink1. The second section creates a new suffix, allowing the server to direct requests made to the database link to the correct server. ThensCheckLocalACIattribute does not need to be configured to check local ACIs, as this is only required on the database link,DBLink2, on server two. -
To implement loop detection, to specify the OID of the loop detection control in the
nsTransmittedControlattribute stored incn=config,cn=chaining database,cn=plugins,cn=configentry on server one.dn: cn=config,cn=chaining database,cn=plugins,cn=config changeType: modify add: nsTransmittedControl nsTransmittedControl: 1.3.6.1.4.1.1466.29539.12
As the
nsTransmittedControlattribute is usually configured by default with the loop detection control OID1.3.6.1.4.1.1466.29539.12value, it is wise to check beforehand whether it already exists. If it does exist, this step is not necessary.
-
Create a proxy administrative user on server two. This administrative user will be used to allow server one to bind and authenticate to server two. It is useful to choose a proxy administrative user name which is specific to server one, as it is the proxy administrative user which will allow server one to bind to server two. Create the proxy administrative user, as follows:
dn: cn=server1 proxy admin,cn=config
objectclass: person
objectclass: organizationalPerson
objectclass: inetOrgPerson
cn: server1 proxy admin
sn: server1 proxy admin
userPassword: secret
description: Entry for use by database links
CAUTION
Do not use the Directory Manager or Administrator ID user as the proxy administrative user on the remote server. This creates a security hole.
-
Configure the database link,
DBLink2, on server two, usingldapmodify:dn: cn=DBLink2,cn=chaining database,cn=plugins,cn=config objectclass: top objectclass: extensibleObject objectclass: nsBackendInstance nsslapd-suffix: l=Zanzibar,c=africa,ou=people,dc=example,dc=com nsfarmserverurl: ldap://zanz.africa.example.com:389/ nsmultiplexorbinddn: cn=server2 proxy admin,cn=config nsmultiplexorcredentials: secret cn: DBLink2 nsCheckLocalACI:on dn: cn="l=Zanzibar,c=africa,ou=people,dc=example,dc=com",cn=mapping tree,cn=config objectclass: top objectclass: extensibleObject objectclass: nsMappingTree nsslapd-state: backend nsslapd-backend: DBLink2 nsslapd-parent-suffix:"c=africa,ou=people,dc=example,dc=com" cn: l=Zanzibar,c=africa,ou=people,dc=example,dc=com
Since database link DBLink2 is the intermediate database link in the cascading chaining configuration, set the
nsCheckLocalACIattribute toonto allow the server to check whether it should allow the client and proxy administrative user access to the database link. -
The database link on server two must be configured to transmit the proxy authorization control and the loop detection control. To implement the proxy authorization control and the loop detection control, specify both corresponding OIDs. Add the following information to the
cn=config,cn=chaining database, cn=plugins,cn=configentry on server two:dn: cn=config,cn=chaining database,cn=plugins,cn=config changeType: modify add: nsTransmittedControl nsTransmittedControl: 2.16.840.1.113730.3.4.12 nsTransmittedControl: 1.3.6.1.4.1.1466.29539.12
nsTransmittedControl: 2.16.840.1.113730.3.4.12is the OID for the proxy authorization control.nsTransmittedControl: 1.3.6.1.4.1.1466.29539.12is the or the loop detection control.Check beforehand whether the loop detection control is already configured, and adapt the above command accordingly.
-
Configure the ACIs. On server two, ensure that a suffix exists above the
l=Zanzibar,c=africa,ou=people,dc=example,dc=comsuffix, so that the following actions are possible:-
Add the database link suffix
-
Add a local proxy authorization ACI to allow server one to connect using the proxy authorization administrative user created on server two
-
Add a local client ACI so the client operation succeeds on server two, and it can be forwarded to server three. This local ACI is needed because local ACI checking is turned on for the
DBLink2database link.
Both ACIs will be placed on the database that contains the
c=africa,ou=people,dc=example,dc=comsuffix.NOTE
To create these ACIs, the database corresponding to the
c=africa,ou=people,dc=example,dc=comsuffix must already exist to hold the entry. This database needs to be associated with a suffix above the suffix specified in thensslapd-suffixattribute of each database link. That is, the suffix on the final destination server should be a sub suffix of the suffix specified on the intermediate server.-
Add the local proxy authorization ACI to the
c=africa,ou=people,dc=example,dc=comentry:aci:(targetattr="*")(target="l=Zanzibar,c=africa,ou=people,dc=example,dc=com") (version 3.0; acl "Proxied authorization for database links"; allow (proxy) userdn = "ldap:///cn=server1 proxy admin,cn=config";) -
Then add the local client ACI that will allow the client operation to succeed on server two, given that ACI checking is turned on. This ACI is the same as the ACI created on the destination server to provide access to the
l=Zanzibar,c=africa,ou=people,dc=example,dc=combranch. All users withinc=us,ou=people,dc=example,dc=commay need to have update access to the entries inl=Zanzibar,c=africa,ou=people,dc=example,dc=comon server three. Create the following ACI on server two on thec=africa,ou=people,dc=example,dc=comsuffix to allow this:aci:(targetattr="*")(target="l=Zanzibar,c=africa,ou=people,dc=example,dc=com") (version 3.0; acl "Client authorization for database links"; allow (all) userdn = "ldap:///uid=*,c=us,ou=people,dc=example,dc=com";)This ACI allows clients that have a UID in
c=us,ou=people,dc=example,dc=comon server one to perform any type of operation on thel=Zanzibar,c=africa,ou=people,dc=example,dc=comsuffix tree on server three. If there are users on server two under a different suffix that will require additional rights on server three, it may be necessary to add additional client ACIs on server two.
-
-
Create an administrative user on server three for server two to use for proxy authorization:
dn: cn=server2 proxy admin,cn=config
objectclass: person
objectclass: organizationalPerson
objectclass: inetOrgPerson
cn: server2 proxy admin
sn: server2 proxy admin
userPassword: secret
description: Entry for use by database links
-
Then add the same local proxy authorization ACI to server three as on server two. Add the following proxy authorization ACI to the
l=Zanzibar,ou=people,dc=example,dc=comentry:aci: (targetattr = "*")(version 3.0; acl "Proxied authorization for database links"; allow (proxy) userdn = "ldap:///cn=server2 proxy admin,cn=config";)This ACI gives the server two proxy admin read-only access to the data contained on the remote server, server three, within the
l=Zanzibar,ou=people,dc=example,dc=comsubtree only. -
Create a local client ACI on the
l=Zanzibar,ou=people,dc=example,dc=comsubtree that corresponds to the original client application. Use the same ACI as the one created for the client on server two:aci: (targetattr ="*")(target="l=Zanzibar,c=africa,ou=people,dc=example,dc=com") (version 3.0; acl "Client authentication for database link users"; allow (all) userdn = "ldap:///uid=*,c=us,ou=people,dc=example,dc=com";)
The cascading chaining configuration is now set up. This cascading configuration allows a user to bind to server one and modify information in the l=Zanzibar,c=africa,ou=people,dc=example,dc=com branch on server three. Depending on your security needs, it may be necessary to provide more detailed access control.
[3] The command to restart the Directory Server on platforms other than Red Hat Enterprise Linux is described in Section 1.3, “Starting and Stopping Servers”.